

Hey folks! I’ve been quiet here, but I’m thinking that a blog just isn’t the right medium to describe what I’ve been doing with pastured chickens. Check out this link instead:
https://github.com/cjchandler/PasturedPoultryEggProject
Author: Carl Chandler
31 may 2024
The wheels worked. I used 8 10″ hand truck wheels in groups of 2 at each corner. This was actually enough to allow me to push the shed around by hand without the winch, and turning was no problem because I can lift one end and then turn like that. The wheels are kind of pricey, 20CAD each, we’ll see how they hold up. I made a skirt to go all the way around the inside (4 walls now) and that works fine too, though the fiberglass rods that hold it vertical do seem to get caught a lot. I think I need to trim them so that they only go down 10”-11” even though the gap is theoretically 12″ from frame to ground.
In the future I think I would like somewhat larger wheels though.
The next step is putting wires for electrification of the skirt. I think the wires need to be only vertical so they don’t get tangled. But then they need to be very closely spaced so a chicken close to the skirt will get shocked and not try to poke under the edge of the skirt. I suppose another method might be to weight the skirt, but I think the scrub brush, will support more weight than it’s realistic to add to the skirt. I’m going to try 10″ vertical aluminum wires spaced at 3″ apart.
Those wire whiskers seemed to work, they rotate back and away don’t seem to tangle when I move it. I put some chickens in and they seemed to respect the electric skirt right away, I had only one escape and that was a miniature chicken that is more my wife’s pen than a real laying hen. I will leave it in place for 3 days so the chickens get used to it, I was keeping them in a portable electric fence and smaller coop. Once they are adjusted to the new area I will start moving. I also will put in a light and temperature logger today to make sure it’s not getting too hot, nor too dark. Hens need a certain level of light to continue egg production, otherwise they think it’s winter.
The growth chamber continues, but I’m waiting on a part to actually start it. It’s actually quite instructive to see what I need, as a large greenhouse will need all of the same pieces. The household humidifier (ultrasonic misting) that I had was not strong enough to really make a difference in the chamber humidity. So I got a cheap swamp cooler with a pad that water is pumped over and a fan pushes air through. There is a industrial analog in a pad wall. It cools and humidifies the air. This was a problem with my pilot greenhouse, I didn’t have a good way to humidify the air. I could cool with fans, but in the winter that causes very low humidity which causes the plants to transpire a lot. This can be bad for fruit production (see Godfried Dol). The swamp cooler works, and I made the fan exhaust the hottest air by the lamps out the window. I’m just waiting on the heaters, which I need because the humidifier lowers the air temperature.
May 10 – May 21 2024
First, the skid barn. It doesn’t work. Well ok, it sort of does but not good enough. The optimal pull angle is about 20 degrees, and that was hard to get with my pull bar. I’m sure I could redesign and get it working but the force required was still very high ( I jerry-rigged it with barrels changing the angle to test that) and more importantly it was ripping up the turf. I think the problem there is that the skid have theoretically a low ground pressure, but because they are rigid and the ground is not flat, they rest much more heavily on the peaks. Then when it is pulled, they tend to shear off the peaks.
I think the solution is to replace the skids with lots of pneumatic tires. These can deform and roll to avoid some of these problems. I am thinking of using 10 wheelbarrow wheels running about 5 psi. Another issue may be that the skids are just too heavy, and wheels will help. I think the barn needs only 200 kg to avoid flipping in the wind. The wheels will only work in one direction, but to crab or move perpendicular to the wheel track, I should be able to lift one end with a lever and make a 90-degree turn with it rolling on just one wheel on each side. The top without the skids is about 170 kg, and I can lift one end of that no problem, so light weight wheel skids should work. Now I just have to wait for the parts to come in.
The skirts seem to work well though.
I worked on the growth chamber and it’s getting close to ready to run. I have 50, 18 watt LED tubes and with those all on, a window fan can keep it at 23c inside using 19c room temperature. I took off the plastic greenhouse film between the plants and the lights because I wanted to be able to have as high light intensity as possible. The load cells have some drift since I don’t have the retaring system here as I did in the greenhouse. I think I’m just going to live with that, the mass is not super important here and I can still get a daily integral of mass loss by doing a manual tare morning and night.
The big question is how much light to give the plants. I simulated a horizontal tomato plant in a greenhouse with my raytracer, but on some days the light absorbed by the plant would be far in excess of what the plant could use. I think this also happened to a degree in my greenhouse experiments where on sunny days they got too much sun which caused a stress response of small self shading leaves, which left them maladapted for cloudy days. So the plants need some shading on sunny days. Or in my growth chamber, I need an upper limit on light intensity. Of course, there is a physical limit of the apparatus, but what is the optimal limit for growth and yield?
Godfried Dol in “How to grow in a modulair greenhouse” states that more than 800 watts reduces the photosynthetic efficiency. I like that book but the units are unclear so I’m not sure if that’s total sun, inside or outside the greenhouse? Others used 800 umol/(m2 s) to test the maximum photosynthesis rate (Gosselin 2000), so likely the optimal light intensity is below that. Looking at Fig. 1 in that publication, and also they noted that peak photosynthesis occurred at peak light intensity for nov-april but only at 4 hours after dawn for may.

This means the maximum light intensity is likely between 800 and 500 umol/(m2s). I’m guessing on the lower end of that too, because we do not want light to encourage high light adaption on sunny days and then be left unable to efficiently use the sun that there is on cloudy days. This is for a vertical tomato plant, where the lower leaves are shaded by the upper ones. So for a horizontal tomato plant, can all the leaves be at 500 umol/m2s all day without adaption to high light? That would be wonderful, and in this case all of the leaves would be working at maximum efficiency, though a lot less of the light incident on the plant would end up being captured since the canopy is less dense. The leaf to fruit ratio could be smaller etc. I don’t think this is super likely. If I assume the top area of a vertical tomato plant as 0.7 m x 0.7 m, and the height with leaves as 2.1 m, the ratio of top area / side area is 0.33. So if we assume that the whole plant can only use the equivalent of 800 umol/m2s on the top, that is the same as 266 umol/m2s on the side of the plant to max out the plants metabolism. But the plant is less efficient at intercepting the light on the side, so the optimum value is between 266 umol/m2s and 500 umol/m2s.
So if I ray trace a horizontal tomato with the weather data from last year, and limit the amount of light absorbed to be 420 umol/m2s I get this:
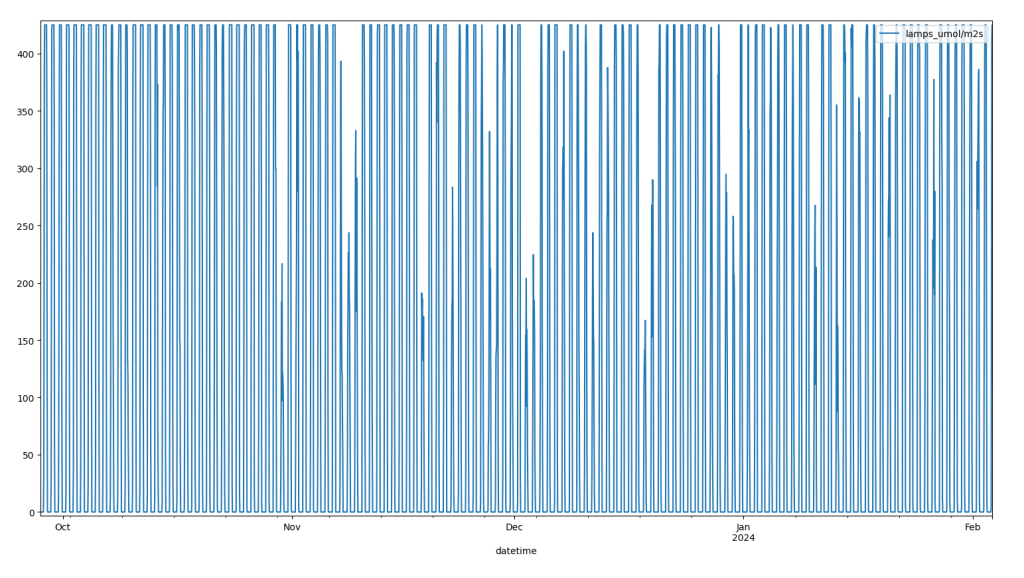
If then I plot the daily light sum of the mol PAR absorbed by each plant, and the weekly running average:

So that looks ok, but the mean light in the winter is a bit low. A tomato plant needs about 5.6 mol per day to produce a decent harvest, though max harvest needs about 8.4 mol per day. (Paponov 2022). Maybe I can get max harvest at a little bit lower light for each plant because of metabolic efficiency of laying flat… Maybe not. We will see. I will test with a 420 umol/m2s maximum intensity since that is easy doable with my setup, and because if it’s any lower than that, the daily light integral becomes so low in the winter the yield probably doesn’t make this setup worth it. As it is, there really isn’t any hope of getting full production all winter, we’re fighting for a 75% or 50% yield. So I’m not super optimistic that this will work, but I’ll try it and see what happens. At any rate, we’ll get one dataset for horizontal tomatoes which has never been tried.
Verheul, Michel J., Henk FR Maessen, Martina Paponov, Anush Panosyan, Dmitry Kechasov, Muhammad Naseer, and Ivan A. Paponov. “Artificial top-light is more efficient for tomato production than inter-light.” Scientia Horticulturae 291 (2022): 110537.
Ayari, O. & Dorais, Martine & Gosselin, André. (2000). Daily Variations of Photosynthetic Efficiency of Greenhouse Tomato Plants during Winter and Spring. Journal of the American Society for Horticultural Science. American Society for Horticultural Science. 125. 10.21273/JASHS.125.2.235.
3 May – 10 May 2024
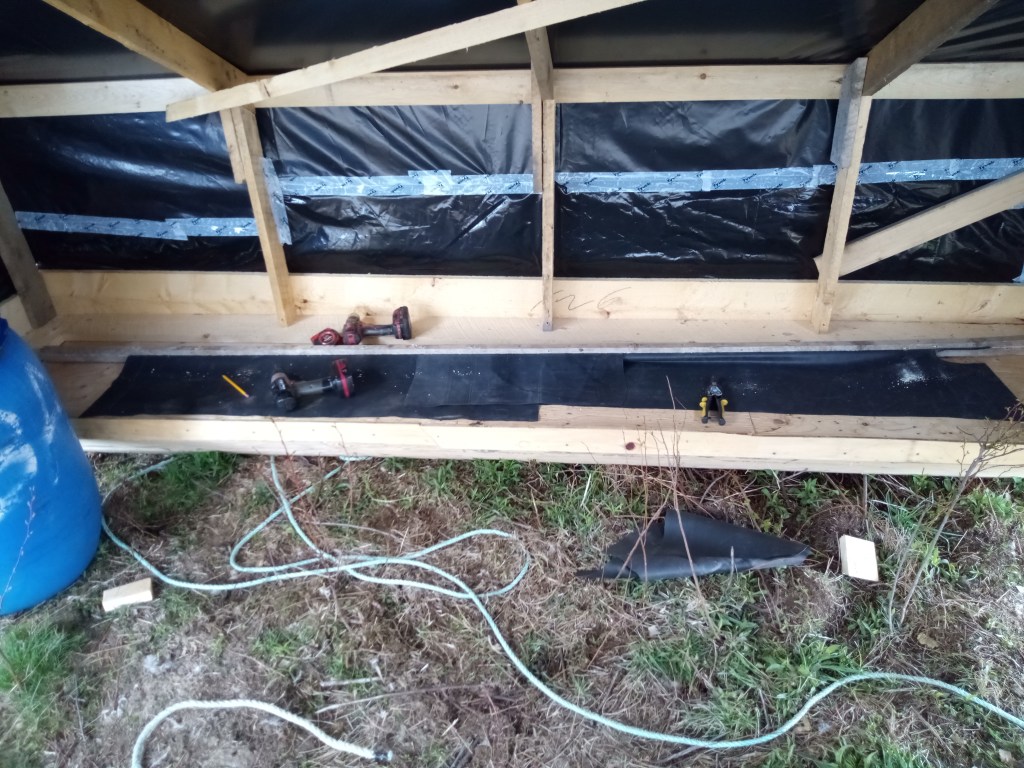
I finished the skid barn topside. I also made a skirt for the gap between the skids. For this, I used 1/4 inch diameter fiberglass poles 13″ long pointing down at 12 inch intervals. Then between those, I have a hanging sheet of EDPM pond liner. I have not added electric wires but it does seem ok like that for now.
Once I added the top side, I couldn’t winch or skid it anymore. That was strange because I didn’t add that much weight, but I’m guessing that as the skids sat on the ground they also absorbed moisture and got heavier too. Anyhow, I got a larger winch (3500 lbs) and was able to move it with the same anchor system.
I then added a winch holder that attaches two pull ropes to the barn and then has a wheel to keep it at the right pull angle. The winch is then on the end of that, which can connect the long rope and anchor. This works ok, but I think I need something a bit more sturdy than a bike wheel.
My goal here is not to make a polished moving barn system, but just to get it to the point where I can use it every day. Then once I’m using it every day, (probably testing it with laying hens first because that’s easiest) I can see what improvements are most important for saving time. I think in general this is a good philosophy for design, make it work well enough for personal use, then go through iterations to improve on that. Trying to go for the final product all at once is likely wasteful, I thought for sure that I was going to have to make a much more complicated anchor system. In actuality, a pick axe mattock, 2 rebar lengths, and a 2×4 was enough.
I wired up everything for the growth chamber for the tomatoes and used phidgets to allow my computer to control it all. I still need to put on the PAR sensors, calibrate, and write the controls code but it’s all looking good. I hope to have the tomatoes planted by May 31.
Apr 29 – 2 May 2024
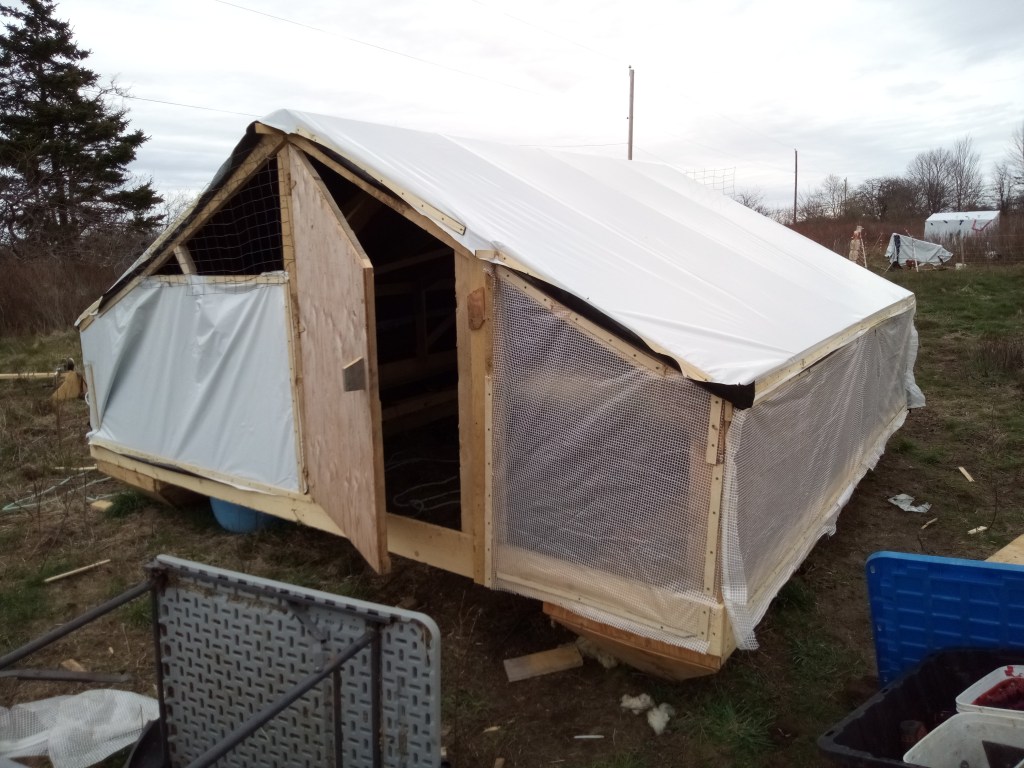
Well, maybe everyday updates are a bit overkill or over-ambitious. I worked mostly on the skidding barn, building a shelter on top. Not much new about it but it does take a while. I looked at just buying a hoop house or greenhouse that would be the right size but it was all a lot more expensive and less sturdy than what I can do with wood. I can also get cheap wood from the sawmill near my house that is unplanned lumber. So rough and gives you splinters but a 1 x 6 is really 1″ thick x 6″ wide or sometimes thicker.
Anyhow I made walls and roof and a base that can be unscrewed from the skids if needed. Then I covered it in 6 mil silage tarp and some leftover greenhouse plastic. I didn’t go full greenhouse because I don’t want it to get too hot, but I did put some greenhouse plastic for lighting. Temperature control could be a big problem, but to keep it simple I think I will make an attached outdoor run so that if the coop is too hot they can just stay outside. I also only have one side clear so in the summer the clear wall can face north, and in the winter the clear wall can face south.
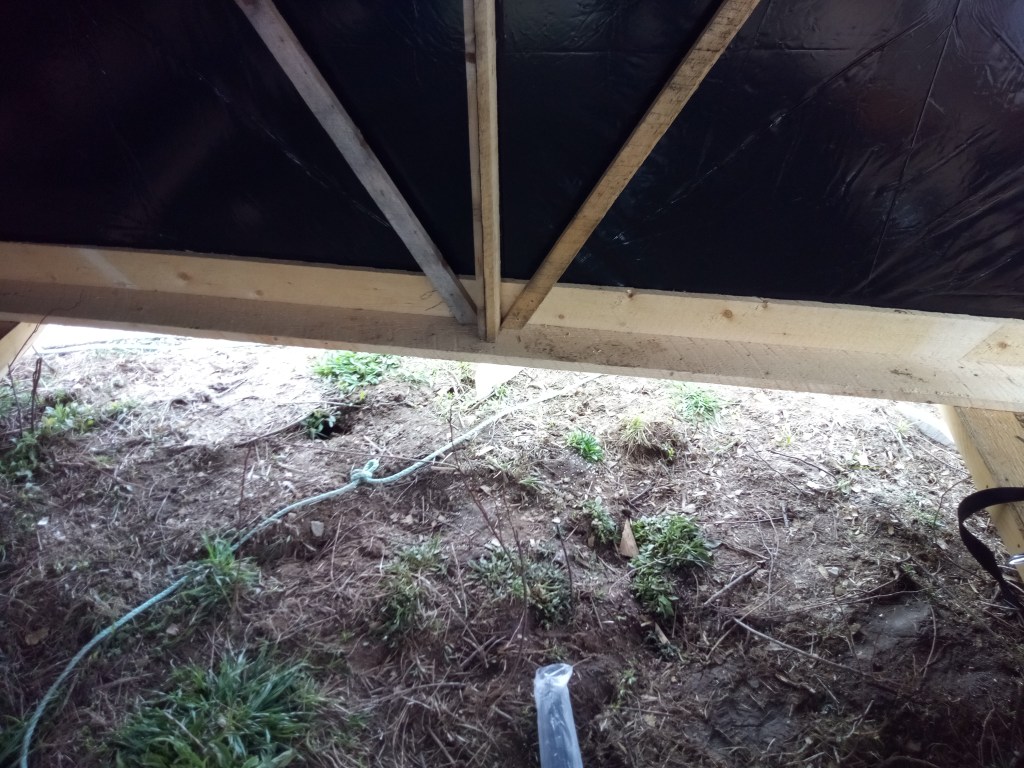
The next step is making a skirt or flap so that the space in between the skids is closed to animals and more importantly predators. I started making a strip of edpm rubber I had from an old pond liner. I will then put thin (1/4 inch diameter) fiberglass rods every foot alternating sides. That will make it hang down straight but also flex over obstacles without tearing (I hope). Then I’ll also add some vertical electric fence wires so animals sniffing around at the bottom will be shocked.
I realize now that I probably could have just made 4 skids in a square, but that would make it harder to skid (always crabbing) and it could be a problem on uneven ground that there would be a big gap. I’ll keep it in mind but the skirt should be cheaper.
26 Apr 2024
I finished the skids and assembled more fence parts. I put the skids together in the field and set up a winch to tow them. Results:
- The skids can be moved with my 800 lbs winch.
- The only ground anchor needed for the winch was a pickaxe rammed into the earth and a couple feet of rebar pushed in at the other end of the winch. The soil here is predominantly clay, so maybe you’d need more in very sand soils.
- The angle of the pull rope with respect to the ground makes a big difference in the ease of skidding. The winch should definitely be higher than the pull point on the skid. If it is lower it tends to pull the skid into the ground, increasing friction. This is almost unavoidable with a long pull rope, there is always some sag.
- Putting a barrel or wheel under the pull ropes close to the skids improves this angle and makes the skidding easier
- Skidding parallel and perpendicular to the direction of the skids is possible. Stress on the cross connectors seems minimal. I used 3 lengths of 4’x1’x12′ strapping.
Sorry about the photo quality… But you get the idea
24 – 25 Apr 2024
I got more screws. I built another skid. It looked much better, so I took apart the other one and made another improved version. I worked a little on the fast fences too. No real revelations here except that 45-degree angles are much easier with my somewhat limited woodworking skills.
Tomorrow I will test the skids with a winch and see how easy it is to move them.
23 apr 2024
I took a break from the skids today because I ran out of screws. So I worked on the growth chamber for the next tomato experiment. I’m not sure how much of this is of interest or useful, but I installed 50 LED tubes on the top, separated from the plant area with a diffuse greenhouse plastic sheet. I then put reflective mylar on top so any stray lamp light is reflected down towards the plants. I wired up about 70% of the lamp tubes and made a design for the rest of the wiring. Tomorrow I will go to town for all the parts (and screws).
I mounted load cells on the ends, there will be two hydroponic slabs with one tomato plant each at either end of the chamber. I will also have the runoff irrigation drip into a bucket that is on a load cell so I can measure the transpiration very precisely. I also started wiring up the stepper motors that will control the light sensor gantry below the plants, but I didn’t get it moving yet.
Probably this experiment will turn into a preprint paper of “Measuring light absorption of tomato plants trained horizontally” and I’ll give an estimate for the light absorption per m2 of floor area, plus all the details of how to build a growth chamber like this one. There are no experiments out there since most people don’t care about growing tomatoes horizontally.
The only reason I care is that there are two possible routes to winter tomatoes that I can see. First is the conventional heated greenhouse with electric lights to cover low-light days in the winter. The other is to build a larger greenhouse where the tomatoes can grow horizontally to absorb enough natural light even on low-light days. The question is: what is more cost-effective? That’s what I have to figure out by testing the horizontal version.
22 apr 2024
I worked on the skids for the movable animal shelter. I completed the one that used 30-degree angles, but it’s rough. I did a poor job matching the angles. I also think the design is too weak. If I hit a rock and the skid has to put all of the shelter weight on one point, I think it’s liable to bust through. I guess the real engineer would do a finite element analysis of the skid and measure the stress. I do not think that would be a good use of my time since the manufacturability of this design is the first problem.
Anyhow, I then designed a skid using only 45-degree angles and lots more supports between the plywood skin. I have not finished it, but it’s looking a lot better. I will probably take apart the 30-degree one and rebuild it to this design as well.
19 apr 2024
I mostly worked on building more fast fences today. I realized it would be better to upgrade my previous prototypes to the final version because there are a lot of parts that didn’t change, but that means taking apart the prototypes.
In other news, I looked into making a battery pack to run AC tools. There are commercial versions of these that are lithium-ion batteries in a box with an inverter that work like a little genset. But they are pricey. I want to run AC power tools, that usually run on universal motors. So I shouldn’t need an inverter, I can run directly from the battery at say 80 volts DC instead of 120 AC. It all sounds good, but I can’t find much info about doing it and the batteries are still kind of expensive. If I do it, it will probably use 12 volt LiFePO4 batteries that have a built-in BMS to prevent damage, then use 7 in series to get 100-80 volts DC.
The impetus here is I had an inherited scythe for cutting hay and brush but the blade broke, and the replacement was 110 CAD! That seems like a lot compared to a carbide brush-cutting disk for 20 CAD. I want to be able to use a corded electric brush cutter wherever. I could just buy a cordless version but the batteries are still expensive and you’re locked into one brand for those batteries. With a DC battery pack of my design I could run a brush saw, chain saw, lawn mower, other home-built equipment, etc that’s designed for AC power anywhere.
The gas versions of all these are something I’m trying to avoid because:
a) I don’t know much about working on small engines
b) I don’t want to pay for gas
c) I don’t want to spend time on maintenance, electric is much simpler mechanically
