Blog

Weekly update: 28 Jan 2022

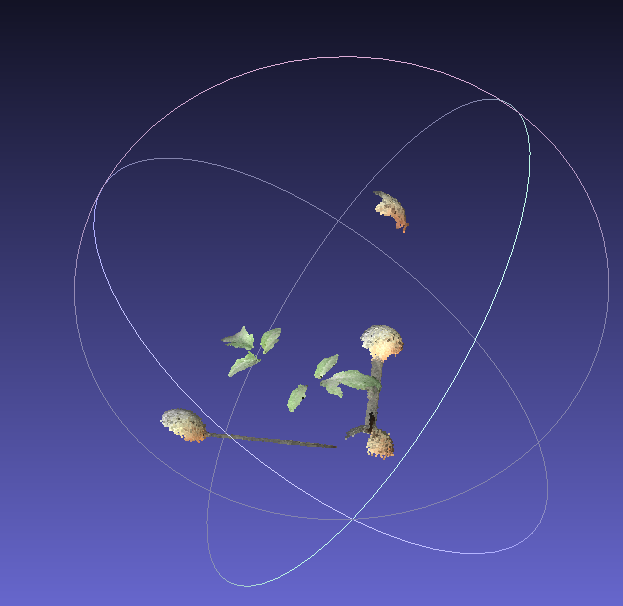
This week was spent mostly on scanning the tomato plants. The previous scans look nice in the visualization, but there is a lot to do before the computer simulation can use that data. First, we have to get the proper orientation. The scanner guesses at a random coordinate system origin and orientation. The scale is right, but the computer needs to know which way is up. The system I developed is to make a small model with spheres to scan with the plant. This is attached to a wooden frame that I can screw into the same holes in the growth chamber every time I do a scan. Every scan has this model included and it’s in the same orientation every time.

Using the program Cloud Compare, I can then make a virtual model, which pretty simple, just 4 spheres. By clicking on the scan of each model sphere, and the corresponding virtual model sphere, the computer reorients the plant to match the orientation of my virtual model. This sadly requires some human input, but I think that’s kind of inevitable.

Once the model is oriented, I save it and run a python script that removes the model. I had a bunch of trouble with this, but then I realized that my orange model and green plants were too close to the same color. By painting the model magenta, which reflects only red and blue light I could use the color to extract only the green scan points, which are the plant leaves. Next, the scan is converted to a mesh of triangles and saved as a .stl file. Then the area of the leaves is easy to measure in my ray tracer program. This part is all automated, and I can set the computer to do a bunch of files at once. The only problem is that the python parts are really slow. If it becomes an issue as the plants get bigger I may have to put this all into c++. But for now I’m not in a hurry, it’s only a few minutes per plant.

The data is somewhat dependent on operator technique, the scanner in hand held and sometimes I miss a leaf. I scanned every plant twice and leaf area results were within 10%, so I think that’s probably good enough, and my technique may improve. Another issue was getting the sphere model in the scan. The plants scan very nicely, they have a lot of texture for the scanner to track. The model is perhaps too smooth. I will add some small magenta “leaves” on it, and use a smaller model that’s easier to keep in the field of view with the plant for future scans.

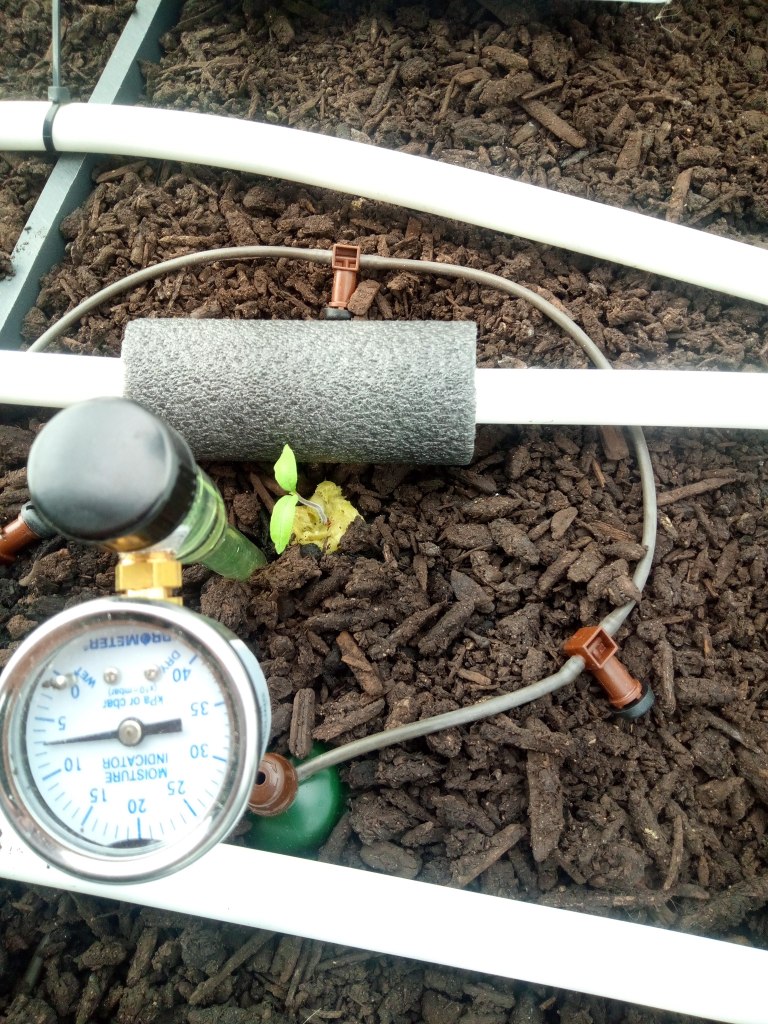
My water manometer did not work as intended… When the pressure differential returned to zero, the water difference would not quite go back to zero. I’m still not quite sure what I did wrong, but I rebuilt it with larger tube and used canola oil as the fluid and it’s fine now. So lower surface tension perhaps? Anyhow, apart from adjusting for the density of canola oil vs water this is preferable since it won’t freeze below 0c. My blower can maintain 20 mmH2O (millimetres of water column) with speed control on max, so I can experiment with pressure in the double layer greenhouse glazing.

Weekly update: 21 Jan 2022

The big accomplishment this week was finishing the ray tracing software, though finish is perhaps the not the right word. All the code needed for simulating a .stl 3D model with transparency, light absorption, reflection and diffusion is done and it passes all the software tests I could think of coding in. However, I fully expect that there is some problem deep inside, meaning the results are not physically accurate. So the next stage is to find that error(s). I designed a 3d printable test chamber that I can easily model the light flux in using my code, but also build and measure the light flux in using my PAR (Photosynthetically Active Radiation) meters. The first test will be a diffuse emitter and a black absorbing chamber, keeping things simple. Then I can add other complications and narrow in on any simulation errors.

Pretty simple. But 3d printing means the dimensions are more accurate than I could make by hand. The dimples in the base are for setting my sensor mount in.

I also worked on inflatable greenhouse plastic glazings. In a typical greenhouse there are two layers of plastic and a blower inflates the space between to keep them apart and provide some insulation. The blowers typically used for these applications seem way overkill. The question is, is that because typical applications leak a lot of air? Or because they want to fill it up fast after power failure? I got a blower and worked on making a test section that was tightly sealed on the edges. I also designed a water manometer to measure the pressure inside. The few sources I could find on that say about 10 mmH2O is enough. The leaking is the key I think, if there are no leaks, the air should be still, which will make it a better insulator.

The double plastic glazing system is pretty well universal on small farms, but it’s not very effective insulation. Even with the best plastics R-1 to R-2 is typical. One question I’d like to answer with the ray tracer is if adding clear plastic gussets in between the greenhouse films would decrease light. I think not, as long as the gussets are normal to the plane of the greenhouse films. This would allow for sectioning off the air space and improving R-value by stopping natural convection.

I also scanned my tomato plant seedlings to calculate the leaf area and orientation for ray tracing. This seemed to work ok, though the leaves were still small and some of the tiny ones didn’t show up in the scans. I didn’t have any trouble with the plants moving during the scan, but now I need to get a process to turn them into .stl files from .ply and remove the markers that I put in the scan to get orientation. I scanned each plant twice so I’ll have an estimate of my reproducability.

Weekly update: 14 Jan 2022

It’s been a good week for productivity I feel. The Blumat drippers are installed in the growth chamber, only not quite calibrated. I only have one tensiometer, so that takes a while to install at each plant point and then manually adjust the Blumat valve to get the proper water tension setting. But this is something that I should only have to do once. The tomato seedlings are doing well, ready to transplant into the soil tomorrow. The growth chamber controls have been working well.

A test seedling

One of my objectives is to measure water use. A scale under each plant, or lysimeter would be the ideal way to do this, however making a big enough soil pot for each plant seemed to hard. My plan is to simply measure how much water is used daily by weighing the water reservoirs for each plant daily. If the water tension remains roughly constant and soil drying is minimal, this should give me about the same information. Water use is closely coupled to absorbed radiation, so higher water use is another indication the plants nearest the south wall are able to use that additional light.

I’ve also gone back to my ray tracing project. I was unable to find a forward ray tracer that would work for my needs, so I wrote on myself in c++. This is close to finished, but this week I went back to simplify the code and add documentation. This will be released as open source eventually. The final project is to add the proper functions for diffusion of reflected and refracted light. A preliminary 3D scan of one of my little tomato plants worked quite well so I think that is doable. The trick with this is that the scans will get progressively harder as plants grow bigger.

Finally, I was able to clear the brush on the field south of the test greenhouse and get setup for measuring albedo. My earlier calculations didn’t indicate that albedo is very important, but I’d like to measure it all the same. Adding a reflective sheet on the south side of the greenhouse in the winter, increasing albedo, is realistic option if it adds light. Especially in my locale where snow cover is often minimal.

south exposure of test greenhouse

Weekly update: 7 Jan 2022

Welcome to 2022! It’s a new year so I’m going to be much more diligent about blogging updates explaining what we’re up to. The main project is a solar greenhouse or crop protection system. By that I mean, no supplemental heat from fossil fuels, and no supplemental electric lights. Such systems are common on small farms know as “hoop houses”, “high tunnels”, “floating row covers”, or simply “greenhouses”. In Canada, these systems cannot really produce significant crops in the winter as they are simply too cold and dark. Hot house tomatoes currently grown in the Canadian winter need supplemental heat and light.

I think there is a possibility of growing tomatoes all year round in a solar greenhouse, but this is contingent on two (as yet untested) hypothesises. First, I believe tomato plants can effectively capture light coming from the side as well as the top. If this is true, then a greenhouse with a tall south wall will have an area where there is enough light for tomato production all year long, at least in southern Nova Scotia where we’re located.

The second it that most of the heat loss is at night, and with movable insulation supplemental heating will not be required. When I say movable insulation, I’m not meaning a thin blanket as in Chinese solar greenhouses (r-3) or a thermal screen, I mean full wall level insulation r-20 to r-40. Oh and the greenhouse has to be practically totally air tight too, so there are minimal infiltration losses.

Then I suppose a third project is warping all this up into a economically buildable package. It’s going to take a while. But, here is the update for the first week:

I’ve been building a growth chamber for tomatoes with artificial light on the top and “south” wall. To my knowledge no one has specifically measured light from the side on tomatoes so this had to be a custom design. I had planned to use arduino capacitive soil water sensors to measure soil humidity. I want soil, not hydroponics, because the goal is to produce organic tomatoes which are more valuable, and keep the capital cost to setup this greenhouse as low as possible.

Unfortunately, these sensors did not work at all. Lots of noise, not very sensitive. I spend a week on them last year and couldn’t make it work. Anyhow, they don’t actually measure what’s important either. The important parameter is water tension (a pressure) which tells you how easily the water in the soil can be extracted by plants. This can be measured with a tensiometer which is basically a vacuum gauge on a tube full of water with a porous ceramic interface to the soil. I decided to go with a commercial version of this, tropf-blumat where the soil sensor is a ceramic cone and the pressure differential opens a valve at the top. I got 6, one for each plant in the growth chamber. Then each plant will have a water/fertilizer bucket on a high shelf.

I set this up, but it was painful. I 3d printed bulkhead fittings for the buckets to connect to the hose, and some hose adapters, but they all leaked. This is a problem with 3d printing (ASA plastic in my case) where there are a bunch of pin hole leaks. I think I’ve repaired the problems now with hot glue coating. Hot glue is one of the few things that adheres decently well to polyethylene buckets, especially if you go slow and get the hot tip to melt and mix with the polyethylene. Then I had lots of air locks in the system, the hoses need to be filled, then routed…not prerouted and filled. Thankfully I had clear tubing so the problem was obvious.

I also measured the light in a grid on the inside of both illuminated panels after finishing the lighting system. This was quite uniform after passing though a 100% diffusing greenhouse plastic so that should make modeling easier. As the tomato plants grow I plan on making a weekly 3d scan of each one and using ray tracing to determining how much light they are capturing.

Lots of other little stuff to do but growth chamber is pretty well ready and tomato transplants are started so the experiment should begin soon. I’ll be happy when it’s on it’s way, the preparing of an experiment is always the most difficult.

Til next week-

Carl

Greenhouse Simulation

Our current modelica greenhouse simulation is now public on github. The documentation is admittedly poor and it has not yet been physically validated so use at your own risk. However, it does have full Fresnel equations for light transmission and integration with solcast historical solar weather data. It should run out of the box on OMEdit the open modelica editor. Validation experiments are in the works, and once validated better documentation will be included.

https://github.com/cjchandler/solarGreenhouseV2

Covid-19 Update

Sun Aquasystems operates primarily in Nova Scotia, Canada, and which has had a relatively low Covid caseload. However, our university collaborators and laboratory services have been shut down due to the general suspension of the economy, and thus our algal turf research has been paused. Preliminary research completed before the pandemic showed encouraging results. High growth rates were achieved and protein levels of those trials were high (30-40%). Unfortunately, it is unknown when the complete analysis of our biomass samples will be finished.

In the mean time, we have been concentrating on a side project of design tools for solar greenhouses. There seem to be few tools available to integrate historical solar weather data and greenhouse structure to model internal heat and light. We will be releasing an open source python program to do these calculations called “Solar Greenhouse Sim”. This will help us build a larger testing facility for algae as well as benefiting traditional greenhouse crops by lowering heating and lighting needs. More details and a link to a git repository will be posted here soon.

Humans Eating Algal Turfs

Gamtae-ji (green algae kimchi) Ulva sp. source: http://blog.daum.net/cjddhkeo1203/491

Humans can eat algae. Traditionally it is mostly used in soups or sushi. Dried nori is a popular wrap for sushi. There have been more recent efforts to bring macro algae consumption into the mainstream, hailed as a “super food” (Warning this is not a reliable source: Seaweed grown in pristine unpolluted seawater can still be dangerous, keep reading.)

Humans can be harmed by eating too much of it, though. It’s not a staple or main calorie source anywhere. Marine algae will give you an iodine overdose in large enough quantities [2], can have high levels of arsenic [5], and other heavy metals like cadmium. [1] High levels of cadmium may be related to pollution in the oceans where it is grown but iodine is always going to be there. The ocean is naturally full of iodine and it is absorbed by the algae.

Iodine does not appear to be necessary for algae growth. In a fully recirculating algae growth system no iodine is added except in the initial fill with seawater. We use an iodine free fertilizer (F/2 solution) and have seen rapid growth. Likewise for other heavy metals, since we do not have any seawater inputs we have no problem with heavy metal contamination. This is of course good news for producing feed for fish and shrimp but it also means that it should be safe for direct human consumption. It is a complete protein source, has omega-3 fatty acids and dominated by Ulva, a species known to be edible.[4]


There is one caveat. If humans are going to be eating it, we need to avoid contamination with inedible species. Right now it’s mostly Ulva (which are edible) but cyanobacteria are toxic. Particular care would have to be taken to exclude these species, it would probably have to be run more as a monoculture. But why would you want to eat algal turfs even if we can? Are they particularly tasty? ( I personally have not tried and am not particularly eager to
do so.) It’s possible that some other types of macroalgae are tastier in which case the same method could be used to cultivate them for safe consumption. Perhaps the best reason is that humans are omnivorous and it’s more energy and space efficient for them to eat algae directly. The high growth rates mean that for a closed life support system (spaceship, moonbase) they can be smaller and lighter. If you can convince people to eat an all Ulva diet the life support system can be very small. If you can’t convince them, you could make the
system larger and they can have a mixed diet of fish, shrimp, and Ulva.


To the stars through algae! Ad astra per algae!

References
[1] Victoria Besada, José Manuel Andrade, Fernando Schultze, and Juan José González. Heavy metals in edible seaweeds commercialised for human consumption. Journal of Marine Systems, 75(1-2):305–313, 2009.
[2] K Markou, N Georgopoulos, V Kyriazopoulou, and AG Vagenakis. Iodine-
induced hypothyroidism. Thyroid, 11(5):501–510, 2001.
[4] Jaime Ortiz, Nalda Romero, P Robert, J Araya, J Lopez-Hernández, C Bozzo, E Navarrete, A Osorio, and A Rios. Dietary fiber, amino acid, fatty acid and tocopherol contents of the edible seaweeds ulva lactuca and durvillaea antarctica. Food chemistry, 99(1):98–104, 2006.
[5] Vivien F Taylor and Brian P Jackson. Concentrations and speciation of arsenic in new england seaweed species harvested for food and agriculture. Chemosphere, 163:6–13, 2016.

Algae Dimensionality

Sun Aquasystems is aware of the failed promises of algae research. Biofuel algae companies in particular have come and gone, leaving large holes in investors pockets’. (A good summary can be found here.)

We believe that one of the main problems here is the zero dimensional algae species chosen to culture. In physics nanotechnology terminology, a zero dimensional object is a point or dot, one dimensional is a line, two dimensional is a sheet, three dimensional is a volume. The definitions can get blurry, but practically all microalgae are zero dimensional. They are roughly spherical single cell (assume a spherical cow… ) with diameter on the order of 1-100 um.

This makes them really hard to culture. The first problem is that they are generally grown floating in raceway ponds or more expensive photobioreactors. This means energy must be added in the form of turbulence to keep them suspended, usually with a paddle wheel. Since each cell is floating along with the currents, the cell must rely on diffusion to bring nutrients towards its cell membrane. This process is relatively slow and the only way to increase the rate of nutrient absorption is to increase the concentration of nutrients in the bulk water. This leads to all kinds of ideas whereby CO2 from power plants is pumped into the ponds to avoid carbon limitation, or concentrated waste water is used with high nitrogen levels.

Zero dimensional algae is also very difficult to harvest. To be used as a feed ingredient it must be dewatered. Marine algae are particularly difficult because any water left in the algae will include 3.5% salt. The process typically involves centrifuges, spray drying, and H. T. Odum is rolling in his grave [3]. The clever solution would be to feed this algae directly to animals that are adapted to filter feed (ex. Oysters) and this is indeed done in some greenwater systems.


One and two dimensional algae are much better choices. These algae species grow in one dimensional strings of single cells (ex. filamentous diatoms) or in sheets one or two cells thick (Ulva Lactuca). In general they can float as plankton but most also have the ability to attach themselves to a hard substrate. In this way they are held still and water currents move past them with a fresh flow of nutrients. A boundary layer develops through which the nutrients must still diffuse but nutrient transport is much faster then the zero dimensional case. In addition, there are now two ways to increase nutrient transfer: increasing nutrient concentration and increasing water current velocity.

References


[1] Walter H Adey, H Dail Laughinghouse IV, John B Miller, Lee-Ann C Hayek, Jesse G Thompson, Steven Bertman, Kristin Hampel, and Shanmugam Puvanendran. Algal turf scrubber (ats) floways on the great wicomico river, chesapeake bay: productivity, algal community structure, substrate and chemistry. Journal of phycology, 49(3):489–501, 2013.


[2] Joseph Ekong, David M Blersch, Kamran Kardel, and Andres L Carrano. Influence of three-dimensional features of a woven-fabric substrate on benthic algal biomass production. Algal Research, 44:101661, 2019.

[3] H T Odum. Energetics of world food production. In The World Food Problems, Vol. 3. Report of the Presidents Science Advisory Committee Panel on World Food Supply, pages 54–94. The White House, Washington, DC, 1967.